For the Farmgirl at heart

Everything farmgirl, vintage, handmade, homemade, fabulous and fun!
Showing posts with label Crafts. Show all posts

Saturday, September 1, 2012

Norco Fair Time 2012!


 I love fair time!  I especially love our little Norco Fair.  It is this cute little fair that combines a Ranch Rodeo/Bull Riding competition with a regular old fair - carnies and all.  I hate the carnie part.  I will never ride carnie rides...there is something very unsafe to me about riding a ferris wheel that was not there half an hour ago.  Freaky.  And I'm not a big fan of rigged carnie games, although we do occasionally play them for the kids.  But I love the fair!  I love walking through the community competition building and seeing all the projects, canned and baked goods people worked so hard on.  You just know some little old lady has made that pie for every family party she has ever attended, and that there is a young woman working hard right now to perfect her recipe to beat that old lady next year.  I also love fair food!  I know, it's just a regular baked potato and corn on the cob...but there is something about the fair that makes it taste better.  The rest of the family had hot dogs with mustard, but I got a corn with butter and garlic salt (YUM!) and a baked potato with butter, sour cream, cheddar, chives and bacon (do I even need to say it?).  How could you pick a hot dog over those?  I will never understand men or children.

 The girls and I love the 4H level of the fair and always go to check out the animal entries.  We were a little late in the day, since we went after school, so we didn't get to see any competitions.  But we did get to look at all the goats, sheep, chickens and a few rabbits.  We saw a cute little group of middle school boys quizzing each other on pig parts for the swine competition the next morning and the girls spent forever trying to feed the cows some hay.  She wasn't having it, but just kind of looked at them and the hay they were holding while she chewed her cud.  Toots kept falling over trying to climb the little hay hill to get closer to the fence and the cow.
This year, Moo finally got to enter the Legos competition.  They have some fun community competitions for kids and the junior division is for ages 4 to 13.  Last year, Moo entered a drawing and a stick horse.  This year she entered a Lego Friends Treehouse.  She was SO excited to enter something in the lego category.  Each entry got marked with the number entry it was, Moo was number 11, so that they could be judged without the judged knowing who made them.  So when we saw them all out on the table and Moo didn't get a ribbon at first she was sad, but then she saw her number sticker and mistakenly thought it was her finishing place.  She said "Mom, I didn't win a ribbon but I got 11th place!"  She was so happy thinking she got 11th place, Daddy and I just couldn't tell her any different.  So if you see her, congratulate her on her 11th place finish.  I entered a hand sewn little mermaid doll.  The one Moo picked out the fabric for that I posted about a little while ago.  I didn't really think I had much of a chance because they usually have very specific categories like knitting, crochet, needlework, sewing, quilting, etc.  This year, all those categories were lumped together into just two - hand work and machine work.  Meaning that my hand sewn doll was competing against all the knitting, crochet, needlework and hand sewn entries.  I almost didn't enter it because last year there were some AMAZING knit afghans and a beautiful piece of needlework that I was sure would put me out of the running for sure.  But when I went to enter them, the ladies taking entries all comented on how cute it was and that gave me a little confidence that maybe I could compete for third if there weren't too many entries this year.  But second?  Never crossed my mind.  So yipee!  And even though this is a small fair, I'm sure if we lived out in a more "farmy" state, this fair would be a joke, I am still proud of my ribbon!  And it's already encouraging me to think of something great to make for next year!  Last year I got a first place for my zucchini bread in the silly category they added to the food competition for anything made with zucchini.  But I think this one means more because it's something I made.  I know I made the bread, but I don't know.  I don't know if that makes any sense, but I am more proud/excited about the second place in the sewing competition than I am at the first place in the zucchini competition.  And it just goes to show that I have NO idea what they look for in these competitions!  Last year I was sure my photo would win, didn't even place.  I entered the zucchini bread on a whim, since I happened to have a load of zucchini from my Mom's garden I needed to use up and was planning on making the bread anyway for the girls.  That got first place!  This year, I didn't think I really had a chance, but I thought Moo's cute little treehouse would place.  She didn't and I got second.  Like I said, no clue what they are looking for, these judges. 
Now to get thinking about what to enter next year...

Sunday, August 26, 2012

The new mermaid on the block

There is a new mermaid in the house.  The one with the pink hair is the one I made for Moo last Christmas (stocking stuffer) and the one with the green hair is the one I just finished sewing about ten minutes ago.  When I was getting all set up to make the mermaids at Christmas, I bought soft flannel in two skin tones (the pale ones above and a darker, tannish brown), five colors of corduroy fabric for hair and four colors of plain old quilting fabric for the tails.  I picked a more traditional look for the first mermaid because I was afraid that the girls wouldn't like them if I made them too funky.  But I let Moo pick the fabrics from my mermaid stash for this second mermaid and she went funky!  She really liked the "undersea flower" print (that's what we named it anyway) and was going to go with the pink hair again, but I suggested picking a different color so all her mermaids wouldn't look too much the same.  I thought she would pick the red or orange...something close to pink, but not pink.  But she picked the green and I think it's really cool!  I also used a tiny button as a hair decoration on this one instead of the rick-rack flower I made for the other one.  I think I like the idea of them all being totally different. 

Of course before this one was even done, Moo was asking for another one and Toots was begging for a number 2 too.  So now after a short break to let my hand muscles heal up (SO not used to that much hand sewing!!!) I will be making a number 2 for Toots.  Then I think I will make Moo a boy mermaid for Christmas and one for Toots...a boy maybe?  These are kind of quick little projects.  Three days max, if you spread it out a lot.  One day to cut pieces, one day to sew the parts and one day to sew it all together.  That's how I have to do it with the girls constantly needing me, anyway.  If I were alone for a day, I could probably make two in one day.  So cute and so fun for the girls!

Monday, July 9, 2012

Merida, Brave Merida

Moo and I had a date on the books a LONG time ago to see the new Pixar/Disney movie Brave when it got to the theaters.  We both really enjoyed it.  Moo because it was a movie about a strong, brave, adventurous princess and Mommy...well, pretty much for the same reasons.  I also liked the fact that this one did not end with her "living happily ever after" married to some prince and that it DID involve the MOTHER (for once not an evil step-mother or one who is MIA) and the entire plot of the movie hinged upon the mom/daughter not understanding the p.o.v. of the other.  Great.  Loved it.  Which lead us to this...


And this...


Moo decided she wants to be Merida for Halloween, so instead of buying the $50 costume at the Disney Store (no, that does not include the wig NOR the bow and arrow set) I made one.  We will either cave and buy the wig at Target or make the white headpiece she uses to cover her hair in the movie.  And I will gladly purchase the bow and arrow set because it is awesome to have something like that marketed to girls.  To make the dress, I just found a pattern for an angel costume (large bell sleeves and a giant bell body with an elastic neck), made it in blue and added a large gold band to the bottom.  Then I made a simple gold sash to tie around the middle and tacked it just a bit in the back because it kept coming just a bit undone and sliding down.  Since I just kind of winged it, it ended up being just about two inches too long.  But I'm going to wait to hem it until Halloween because with my luck, I'd hem it now and it would be way too short by then.  This kid grows like a weed!  Happy early Halloween!


Sunday, April 22, 2012

Homemade Non-Easter Easter Dresses

Well, I haven't posted in a while.  The Hubby changed his work schedule, which will be changing again at the end of the summer...so much drama...anyway, I'm basically a single mom- with someone sending her money to support the kids and herself.  So I don't get to blog as often as I like.  Someday I'll save enough to buy a laptop so I can blog from the familyroom, which would allow me to blog every day!  Can you imagine?  But for now, I have to wait until conditions are just right to go clear across the house for 20 to the only room in the house wired for internet access.  Frustrating.  Anywho...

Do you remember back in January I posted about some happy mail?  That I got a package of fabric that I had ordered from Hawthorne Threads?  Well I made dresses for the girls just in time for Easter!  Yes, I know they aren't exactly Easter dresses...but I let Moo pick out her own fabric, then I picked out something kind of complimentary for Toots and since when I ordered them I was not thinking of Easter, this was not an issue.  But since I had time and got a wild hair, I decided to bust them out in time for the holiday.  Plus I've always wanted to make an Easter dress.  Of course, it was freezing on Easter so the girls are wearing long sleeve shirts and Toots is wearing leggings too.  I promise the dresses are not as sloppy as Moo is making hers look.  I made Moos' first and followed the pattern exactly, gathered top and front pockets.  Then I modified Toots' little dress to be easier/faster.  I omitted the pockets because she doesn't need them and I actually like the cleaner look as opposed to the broken line the pockets make.  I also did pleats instead of the gather along the yoke.  I thought this would be easier, but I did have trouble keeping the pleats nice and neat while sewing.  It was a faster set up to do the pleats, but totally easier to sew the gathers.  A toss up, I think.  There is a little button at the top/back of the dress which I was proud of since I have never done anything with a button before.  The girls both seem to like their new dresses and I made them in sizes 7 and 3, so that they should last for a while ( I hemmed Moos' up after I finished it so that it would be the proper length.  The main difference between the 6 & 7 was the length.  It can be let out as she grows.)

Moo likes hers so much she wore it to Costco the day after I finished it.  A woman with about 5 kids all under 10 asked if I made it.  I told her I did, she said it was cute, then we went on with our shopping.  After I had a huge inner dialog about why she would ask that?  Does it look homemade?  Is that a good thing?  I thought it came out rather well and since Moo liked it so much I was pretty darn proud.  But boy did that lady ever throw me for a loop.  I never thought I would be bothered so much by something like that.  Now obviously, I don't care if someone else likes the way I dress my kids or whether or not their clothes come from my machine or Target, but I hope that kind of thing doesn't rub off on the girls.  I hope they always like wearing the things I make them.  I hope they always think of how much time and love went into those items...so much more special than a $10 dress from Walmart.  But I guess we'll see in a few years...

By the way, the fabrics are from Hawthorne Threads and the dress pattern is the Ice Cream Social Dress from Oliver & S.  In case you were wondering.

Wednesday, January 11, 2012

Happy Mail!!!

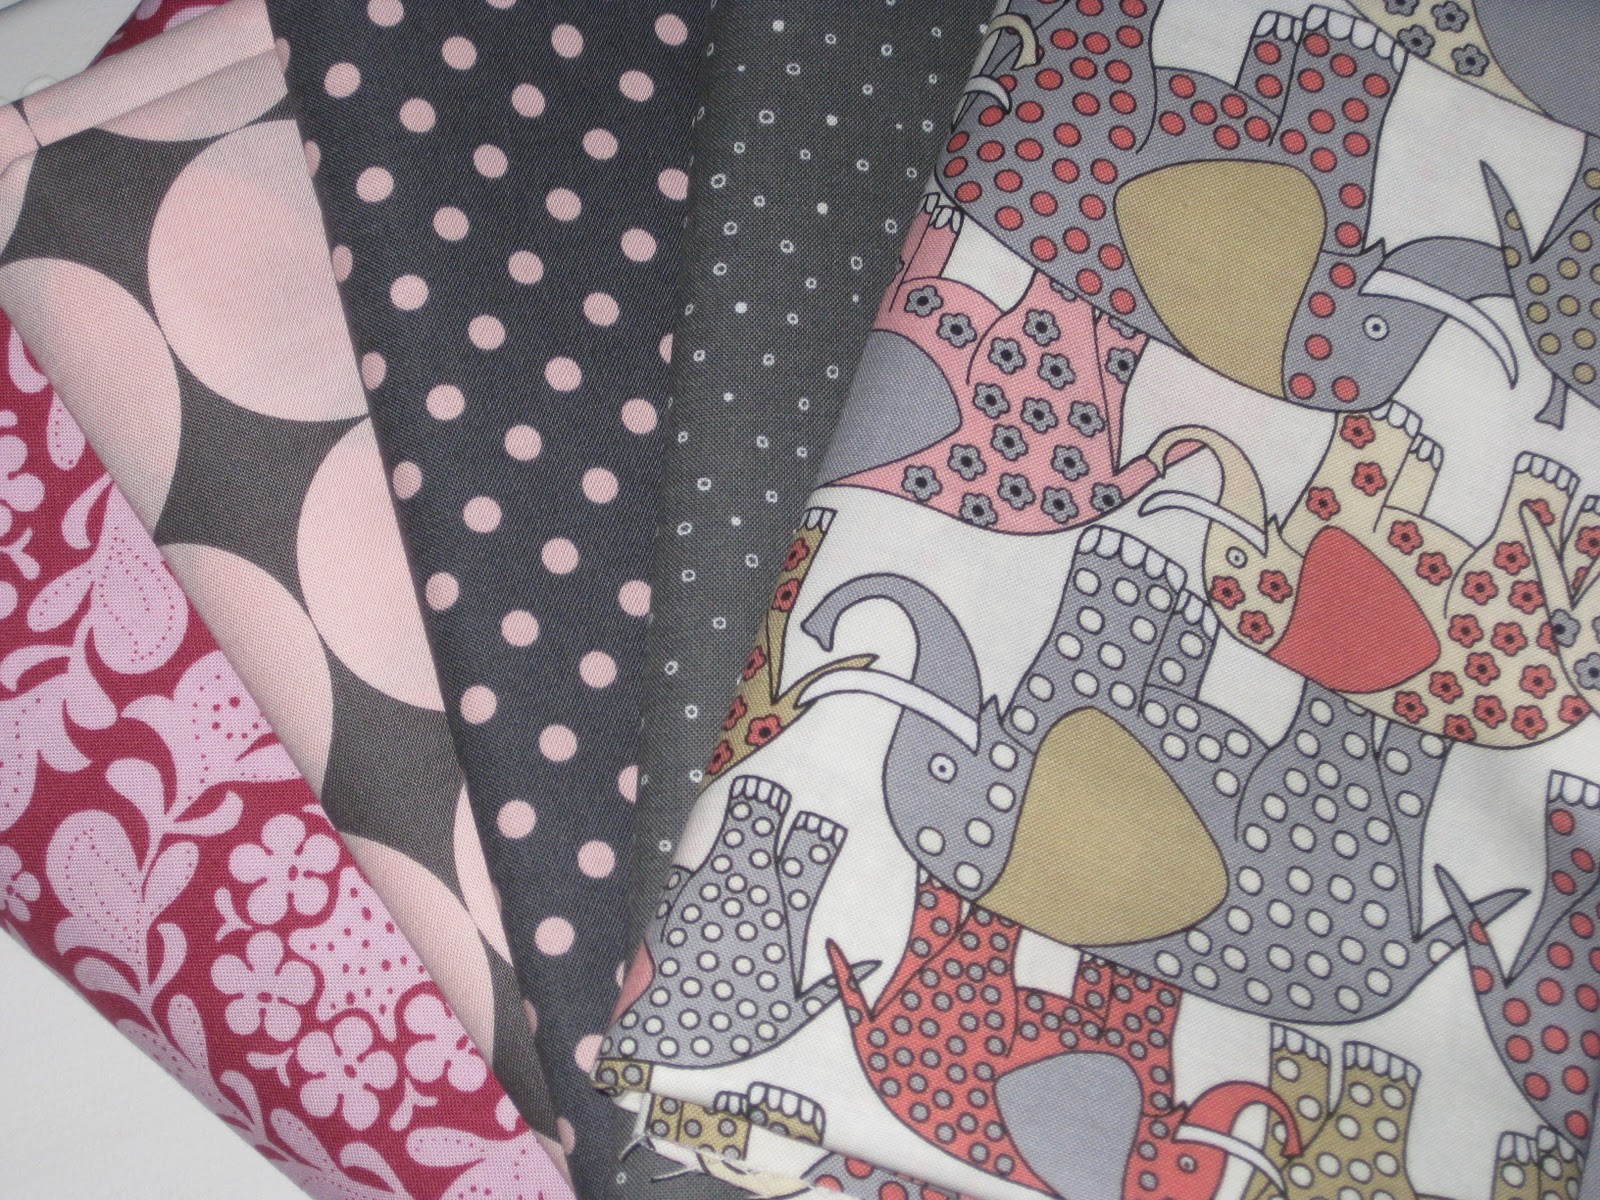
Look what I got in the mail today!!!  The elephants (sorry they are upside down) and the grey with little swirly dots are for a dress for Moo, the large and small pink dots are for a dress for Toots and the two tone pink is for a shirt for me!  I let Moo pick her own fabric - I was not expecting that one.  And I picked for Toots and had to go with the pink and grey dots because they were just adorable and I LOVE pink and grey together.  And the tone on tone fabric was a hard choice for me, I don't usually wear patterns that bright, but it was between this one and another, but this one was on sale.  Had to go with the sale!  And I think it will look nice in the pattern I have from Indigo Junction.  The girls will be the Ice Cream Social dress pattern from Oliver & S.  So cute.  I'll post pics when I complete them.  These projects will have to wait until I tackle the Hoarders paradise that is my craft room/office.  Every time I come in here to use the computer I'm afraid of being trapped under a tower of collapsing scrapbook paper.  I need to get this under control before I can begin any new projects OR finish any of the long term/pending projects I've got stashed around here.  But it was fun mail to get!

*Fabrics were purchased from my new favorite fabric store Hawthorne Threads!  Check them out, they carry some SUPER cute fabrics!!!

Sunday, December 25, 2011

Handmade Mermaids

A few months ago I found the directions for these cute little handmade mermaid dolls from Wee Wonderfuls and found a free tutorial.  Of course, I can't find that tutorial now so I just posted a link to Wee Wonderfuls so you can see all of her wonderful stuff.  So creative that one.

So after deciding that I just had to make them, I, well, made them.  Actually, I waited until closer to Christmas, since I am really trying not to give the girls gifts just because.  So I bought the fabric, followed the directions that I had printed out weeks before and worked on them slowly.  S-L-O-W-L-Y.  I had to wait until Moo was asleep AND Daddy was home to hold Toots, since she is not a big fan of sewing machine noise.  A little bit here, a little bit there and some sewing machine problems (I still have no idea why the machine decided to change tension on me in mid fin) I finally finished late night Christmas Eve.

Cute, right?  The one with the blue hair belongs to Toots and the pink belongs to Moo.  They came out pretty good, if I do say so myself.  And I was afraid that I would have spent all that time on them and nobody would want to play with them, but Moo seems to like them well enough.  Toots is still not too interested in dolls, but she did carry it around for a while. 

Mermaid in stocking.  They were just too cute - no wrapping required.

Seems to be enjoying her new mermaid.  Here you can see the size, perfect for little hands.  Not so perfect for bad eyesight and hand sewing.  It was about 50% machine and 50% hand stitching, and my big meaty hands are not meant for delicate stitching!  But in the end, it all worked out and now the girls have some cute little dolls.  Moo even asked if I could make her another one so her mermaid could have a friend.  I think that means it's a hit.  I told her I'd make her one for her birthday (in March) and that she could pick out the fabrics.  She should have loads of fun with that project!

Making Ornaments with Moo

Moo and I decided to make some ornaments after seeing Meg over at Whatever with her SUPER cute flower pearl pin ornaments.  So we headed out to the craft store and picked up one of those bottles of scrapbooking flowers, pearl headed pins and I already had some styrofoam balls from some other project.  I put the bits in a crafty tin (a plastic muffin tin) and we got started!

Moo picked out the colors, we both used pink flowers since one of those jars could easily cover more than two balls.  Then she picked pink pins and I picked white.  I just thought it would be nice to have a little contrast, but it turns out one box of 100 pins covers basically one ball - depending on how many flowers you try to stuff on there.

I was a little worried at first and hesitant to do this craft with Moo, since it does use long head pins and it requires a lot of patience, which Moo doesn't really have.  I finally figured that we could just stop when she got tired of it and pick it up again later.  And I had her put the ball in one of the open spots on the craft tin while she was sticking the pins into it, so she would be less likely to stick herself.  As you can see, she really enjoyed herself.

She was extremely careful and placed each flower on the ball in just the right spot before pinning it in.  We discovered early on that it is kind of hard to remove the pins once they have been pushed in.  I was worried about how easily they would come out - I didn't want them to just drop out on the floor with the baby running around, so I tried it out.  Pretty hard to pull them out when you are really trying, so that was good.  It's also harder than you would think to push them in there.

Moo really concentrated and kept at it until her ball was totally covered.  I was very surprised at how focused she was on this activity.  Probably due to the fact that every two seconds I was telling her what a good job she was doing, how pretty her ornament was looking and how grown up she was to be using very sharp pins so carefully.

Her focused face.  I don't see it often, had to capture it.  By the way, she is still in her jammies since this was about 9 a.m. but she had to "fix her hair".  This is how she did her hair for the day.

The finished product.  Very cute if I do say so myself.  Sorry it's a little blurry, I was using the bad camera and had to turn the flash off since it just whited everything out.  The flowers came in a few different shades of pink and some had glitter on them.  Moo loved her ornament and was VERY proud to show it off.  All in all it was a great project that we just might do again in a different color.  Thanks Meg for the great idea!

Friday, December 16, 2011

Teacher Gift Idea

If you have a teacher to give a gift to this Christmas (or this would also work for an end of the year gift), then have I got the gift for you!  The Teacher Survival Kit!  I saw something similar to this on a few blogs and thought I could tweek it to fit Moo's Kindergarten teacher - who is a Saint, by the way!

You just get a jewelry supply organizer, tackle organizer, anything with a bunch of small cubbies in it that closes securely, then go to town filling it with things you think your teacher would need and appreciate!  I went with a red, white and black theme, but you don't have to use a color theme at all.  I just liked the look of everything matching.  I went with Sharpies, pencils, large and small paper clips, binder clips, rubber bands and magnets.  I also added a headache medicine (after a day with 30 5 year olds, I would need those), some chocolates (because they are yummy!), some breath mints (mainly because they were red, white and black) and some heart stickers because she gives the kids a sticker when they are leaving if they were good in school that day.  An easy way for the parents to see if they kid acted up or not. 

Then I got a cellophane bag and some ribbon and there you have it!  I also added the apple post-it dispenser because she is ALWAYS sticking post-its on everything and every teacher needs an apple for her desk, right?  So cute.  This gift was not too expensive to put together, but making two or more would be more cost effective, as I was left with a bunch of paperclips and chocolates and such that wouldn't fit in the bins.  So make one for each of the teachers in your life and spread some love this Christmas!
P.S.  All items used in the bins were purchased at Walmart, as were the bins themselves.  The decorations and the fancy pencils were from Michael's craft store. 

Saturday, October 15, 2011

It's beginning to look a lot like Halloween...


Yes, it's getting to be that time again!  And since Moo has been stuck home for the last few days with a cold I've been looking for ways to keep her busy that are rather sedentary due to her fever.  She asked to get her nails painted black for Halloween and I guess I'm a bit conservative or something because I don't think little kids should wear dark colored nail polish.  Not red or black or dark purple, nothing too adult and nothing too goth.  So I said a big N-O to the black, but countered with orange.  She thought for a second and said it sounded too boring.  So I argued that jack-o-lantern fingernails certainly weren't boring and she'd probably be the envy of her class with such interesting Halloween fingers.  She was sold.
Just a bit of orange polish, then a little Halloween magic with the old Sharpie and viola!  Jack-o-lantern fingernails!  I was thinking about doing something similar for myself for the Kindergarten class party I'll be helping out with next week.  For mine, I was thinking black polish and using the french manicure white pen to make little spiderweb lines.  The other option is purple polish, white web lines and a dot of black in the web to look like a spider.  I just don't know what I'll go with.  So many choices, so few weeks out of the year where you can do this stuff and not look insane.

Saturday, September 24, 2011

I Won an AWARD!?!?!

Wow, can you believe it?  I won something for this blog!  I know, I can't either.  But The Fearless Farmgirl just gave me one!  She has such a fun blog to read, but I don't get the chance to get over there as often as I like.  Lately, Moo and Toots have been so crazy (with school and teething, respectively) that I can't even seem to fold the laundry that is sitting in a huge pile on a chair in the corner of my bedroom.  Sigh.  Anyway, I stopped over there the other day and found that she had given me this award!!!!


Liebster+Award.png


Pretty cool, huh?
"Liebster" is a German word meaning dear, sweet, kind, nice, good, beloved, lovely, kindly, pleasant, valued, cute, endearing, and welcome.The Liebster is awarded to spotlight up and coming bloggers who currently have less than 200 followers.

Well, I have WAY less than 200 followers, that's for ding dang sure.  But to those 10 of you out there...and I'm serious, I have 10 followers, I'm so glad you check in with me from time to time.  Being a stay-at-home Mom can be challenging sometimes when you feel like there is no one to talk to.  I mean sure, I can talk to Moo about Dora til we're both blue in the face.  And Toots and I can talk gibber-jabber for hours on end.  But when the Hubby comes home from work, the last thing he wants to do is hear me go on and on about what I saw on t.v. or how I'm thinking of coloring my hair, or how I just read in InStyle about this new nail polish that has real metal flecks in it and a magnet in the lid of the bottle so that after you paint your nails (while they are still wet) you can run the lid over them and create really cool ripple effects.  Seriously, I just read that an hour ago in InStyle.  I may have to venture out to find this mythical nail polish at some point.  But I think I'm getting off track...

So since I got this award from FF (Fearless Farmgirl), which you should totally go check out using the link above, I have to follow the rules of the award and pass it on.  I have to pick 5 blogs to win this award that all have less than 200 followers.  This could be hard, because I read a ton of blogs, but I have never looked to see how many followers they have!  So here I go to find my favs. (current favorites, that is, I love you all!)...

Oh, and here are the other things I must do, so you who win this lovely award after me will know what to do as well. You must...
1.  Thank the giver and link back to their blog.  Done.  
2.  Reveal your top 5 picks and let them know by commenting on their blogs.  Doney-Done.
3.  Copy and paste the award on your blog. DONE!
4.  Have faith that your followers will spread the love to other bloggers. Hmm....Just kidding! Done.
5.  Have fun!  Done and DONE!

So here we go with my top 5!  Drum roll please....
(p.s. click on any of the winners names to go to their blogs)

Cattle & Cupcakes! - I love checking this blog.  As a Mom with a baby, I love all things baby and she has the most adorable little baby girl on the planet, second only to my own.  Come on, you knew I had to say that right?  I really like the posts about products she and Annabelle like.  I can always use a good review!

Heather Ann! - Heather is my bestie and I love checking in on her blog.  She puts so much of herself on there it amazes me.  Sometimes I feel like so much of the blogging world is rather superficial (what I did today, what color I painted my nails, etc.) but she always has something deeper to comment on.  

Crafty Mama of 4! - I don't think I need to explain this one.  Crafty, party of one?  Your award is ready!  Now technically, she has less than 200 followers, although her Facebook page is a LOT bigger than that.  But we're just going with blog followers, right?  Anyway, I love this blog - check it out.

Itchin' Stitchin'! -  Ok, technically, this blog has just over 200 followers, but I just love it and I had to give her this award.  She and her kids are just so cute and she is so creative!  I love seeing the projects she posts about and I wish I could make cute little bags like hers.

Green Owl Crafts! - This chica is seriously crafty.  SERIOUSLY.  And she's always giving away free printables and posting about things she is adding to her Etsy shop, which is also great, in case you were wondering.  Check her out, but make sure you have lots of paper, ink and a few dollars for the Etsy store!  

Well there you go!  Five blogs I love that have now, won awards!  Yipee!  So go forth winners, and spread some love!!!

Saturday, September 10, 2011

Room Re-do

Here's a good idea you can use too.  If you want to re-do a kids room into a more "grown-up" kids room and are sure that they will change their minds about decor a zillion times before they leave the nest, use inexpensive stuff.  Also use stuff that is not an age definer.  Example, do not go top to bottom Dora the Explorer!  In a year, Dora will be old news and you will be re-doing your re-do!  Try instead to focus on something they like, but in an off angle.  Moo LOVES My Little Pony, so I went to the craft store and found these $5 paint by number horses.  We will frame them in thrift store over the top gold frames and hang them in the room.  We are also using mix & match floral sheets.  When you enter this room, you won't  know how old the girl who lives here is...well, as long as the toys are put away.  We channeled her love of ponies into horse art that will work well beyond her My Little Pony phase.  Much more likely to stick around that way.  Just a thought.  I'll post pictures of the room when it's done, but hang in there for the long haul folks, because I think this re-do is going to take a LONG time.  Too much other stuff going on, but I'll be working on it bit by bit and it will get done eventually!

Monday, September 5, 2011

Crayons!!!


So I've been seeing lots of broken crayons around the homestead and finally decided to do something about it!  I got myself down to the Walmart and picked up a really cheap mini muffin tin for about $3.  Then I spent an hour peeling the wrappers off the broken crayons that had collected at the bottom of our crayon lunch box.  That sounds strange, but our crayons do not eat lunch, they reside in a tin lunch box.  Anyway, after the pieces were all peeled (which was terribly annoying and I don't recommend doing it when you want to look your best because I now have a million different colors of crayon under my fingernails) I broke them into small pieces and combined them in the mini muffin molds.  Some spaces got different shades of the same color.  Some got a few colors and some got a kind of rainbow.  I really enjoyed playing around with the color combos and seeing what they looked like in the end.
  As you can see, we had a lot of reds, oranges and yellows.  My favorite is the one with the blues.  I think it looks like the ocean, so pretty.  The cool thing about these crayons is 1. they are being recycled into new crayons, because let's face it - kids don't ever use the broken crayons and 2. when you color with them, you
never know what it's going to look like!  How fun is that?!?!  I've decided to package some of them up with  a homemade coloring book for Christmas gifts for some of my dear friends (you know who you are!) and to package some up to give to Moo in her stocking!  Yes, that's right.  I did this project without Moo.  Gasp!  Shock!  In my defense, I tried to get her to come over and help me but she was too into her movie (Enchanted) and wouldn't budge.  So I did the entire thing myself.  Yes, it was super fun.  Yes, it would have been great to do with kids (as long as an adult does the actual baking part).  So now she has no idea that lovely creations are sitting right behind her on the kitchen counter.
So here's all you do.
1. peel paper off broken crayons
2. break broken crayons into bits that will fit in your molds
3. fill oven safe molds (muffin tins work great) with bits of crayon
4. heat oven to 350*F
5. when oven reaches 350*F turn it off, then place muffin tin in oven
6. watch the crayons carefully, remove them if they start to smoke
7. keep tray in the oven until the crayons look like soup and you can't see any large crayon chunks
8. let cool completely!  When totally dry they will shrink and fall right out of the mold.

* When popping them out of the mold, place two or three towels on the counter and turn the tin over on the towels.  If you do this on your counter, the crayons may crack.

Now color away!  So fun and easy!  I got the instructions for this from the internet and there are a million ways to do it, so you can use these instructions or find your own.  But please keep in mind that I am not a professional crayon melter and can not be held responsible for you burning down your house.  Crayons are made of wax and wax can burn and catch fire, so watch that mold while it's in the oven and do remove it if it starts to smoke.  There, disclaimer done.
 Which is your favorite?

Monday, July 18, 2011

Pet Rock Painting

Another item from our Summer Fun List was making some pet rocks.  Moo loved the idea and couldn't wait to get started.  She was concentrating so hard.  

It can't be too serious.  They are pet rocks after all.

Moo made a family of Rainbow-gators, a new species of gator who live under a rainbow and therefore are quite colorful.

I went more traditional with my Gator family.  There is a bow on the little one too, you just can't see it in this shot.  Mommy, Moo, Toots and Daddy (the one showing off his teeth).

After a long afternoon of pet painting, it's nice to relax with a little cocktail.  Don't worry, we were both drinking apple juice.  She just likes to use the "fancy" cups.  She even sips with her pinky out.

Monday, July 11, 2011

Painting the Driveway


So I pulled a great idea from my Summer Fun List for Moo to do today while the Hubby and I cleaned out the garage.  I got it here, WhiMSy love, and if you have kids you'll love it too.  It doesn't matter how old they are, if they can hold a paintbrush, they will have fun.  It's really simple to make chalk paint - a little water, a little corn starch and some food coloring!  That's it!  It's basically the same as plain old chalk, it washes off with water, but it's like the difference between coloring and painting.  Moo likes to color, but she LOVES to paint.  This seemed to make plain old sidewalk chalk REALLY, REALLY fun.  Toots liked her view from the stroller we stuck her in and parked in the shade.  And Mommy and Daddy got quite a bit of work done while everyone was playing.
While I'm at it, you should really check this blog out.  I LOVE it and since stumbling upon it have checked it every day for great kid-centered fun.  All of the stuff she does seems like it would be so FUN to do with the kids.  And since she has two girls too, the crafts are all things that we could do here with total success.  The other thing I find inspiring about this blog is that Nikki so enjoys spending time with her kids and really has fun doing all these things with them.  I think that is the key.  To have FUN with your kids.  Not give them something to do, then ignore them while they do it.  I don't know, I love it.  Click on the link above for the chalk paint, or the button link to go to her most recent post.  You'll love her, trust me.

Sunday, July 10, 2011

Bridal Shower Sneak Peek....

Hmmm......What could these be for?  Why a perfectly charming, vintagey themed Bridal Shower, of course!  Can't give away too much though, the Bride might be watching...

Saturday, June 18, 2011

Reading Teepee

Earlier today I was searching the blogosphere when I happened across this little gem.  I found a picture and a link to a site called tatertots & jello about a cool summer reading teepee.  Super cute idea!  I clicked on the link and it was just awesome!!!  I think I will add this to the ever growing list of things I want to make to put in the girls' playroom since it seems to also appeal to the older kids as well.  Just click on the link to go on over and check it out.  On a side note, I'm going to be checking on this blog now too.  Anything involving bunting, red & aqua and cute DIY is alright by me!

Tuesday, June 14, 2011

Modern Parents, Messy Kids


I am loving this blog I just stumbled across!  Great links, great ideas, just all around greatness!  If you have kids you need to make checking  this blog at least a weekly thing.  

Tuesday, March 1, 2011

Party Prep 2

Moo's 5th birthday party is getting closer, so party planning/creating is in full swing. Here is a picture of the pony I painted on poster board for the "Pin the Cutie Mark on the Pony" game that we will play, using stickers of hearts, stars, all different shapes to put the little mark on the butt of the pony that all My Little Ponies have. Moo picked out the colors and the name of this pony, since we decided it should be a special pony for the party. Moo loves her (this is modeled after the new My Little Pony show that is on the HUB network, her favorite as opposed to the ones I grew up with). I think it looks a little evil, but I guess that's just me. One game down, a gillion more to go!

Thrift Store Decor

As you can see, I'm in the middle of painting my bedroom, so bear with me. I just wanted to share this little snippet with you. I know many of you have seen this idea on a number of decorating shows or magazines, but it really is a fab idea. For anywhere from $0.25 to $5.00 (or more, really) you can find cute little plates, saucers and trays at your local flea market/thrift/antique store and hang them on your wall to add a bit of interest and color to a blank space. I refuse to pay more than $2.00 for a plate, so none of the ones pictured here were more than that. I also prefer the kind of freeform look that hanging them as I go creates. I think the wonky shape is a bit more visually interesting. These hang above my rocking chair in the corner between my bed and the crib and I just love them. The Hubby isn't too much of a fan, but they aren't on his side of the room, so he says they can stay. Yipee!